Wednesday 28 September 2016

There’s been a long-standing issue from a hosting provider’s point of where cPanel runs on abnormal ports, causing users behind firewalls to be unable to access cPanel. At first, there was cpanelproxy.net which offered (at that time) an automated script that users could install on their hosting accounts to route cPanel traffic over port 80. Around the time that cPanel 11 came out, the script no longer worked, and users behind corporate or school firewalls were out of luck.

cPanel 11 introduced its own proxy to allow users to get around firewall restrictions.

Accessing cPanel Through A Firewall

To enable this feature without inconveniencing users, check these three options in WHM > Tweak Settings:

Add proxy VirtualHost to httpd.conf to automatically redirect unconfigured cpanel, webmail, webdisk and whm subdomains to the correct port (requires mod_rewrite and mod_proxy)

Automatically create cpanel, webmail, webdisk and whm proxy subdomain DNS entries for new accounts. When this is initially enabled it will add appropriate proxy subdomain DNS entries to all existing accounts. (Use /scripts/proxydomains to reconfigure the DNS entries manually)

Allow users to create cpanel, webmail, webdisk and whm subdomains that override automatically generated proxy subdomains

*Keep in mind that if you’re establishing these settings on an existing server, it’s going to update the zones for each domain on the server and synchronize them out to the DNS cluster. This got us in trouble once, as we had a number of suspended accounts on a server that ended up having their DNS reverted back when the proxy subdomains were updated.

To enable proxydomains for the whole server:

/scripts/proxydomains add

To enable for all domains on one user’s account:

/scripts/proxydomains –user=<user> add

To enable for a single domain:

/scripts/proxydomains –domain=<domain> add

To remove proxy domains, use the same commands as above, only use “remove” instead of “add”. From here, you can access the proxy at http://cpanel.domain.com (or webmail/whm, respectively), or access cPanel normally and let it detect whether you are behind a firewall.

Saturday 24 September 2016

Is Free WordPress Hosting Worth It?
With so many hosting plans out there, finding the right hosting provider for your site isn’t an easy call. Most hosting packages require a monthly charge, but you can get WordPress hosting for free – and other providers also offer free hosting plans. So, should you really be paying for web hosting? Is free WordPress hosting worth it or does it come with a hidden cost?

Free Hosting: Some Obvious Drawbacks

Free hosting is available with several web hosting providers in one form or another. Usually they offer a very basic version of a website. This limits the functionality of the site both in terms of performance once it’s up and running, and in terms of the content you can put on the site. The drawbacks include:

Limited bandwidth
Limited space
Limited email accounts
Subdomain instead of a unique domain. For example: mysite.wordpress.com or mysite.wix.com. If you want to use your own domain name – mysite.com – you’ll have to pay to register the domain and connect it to your website.

We advise against running a business from a subdomain site – it appears unprofessional and untrustworthy. If, however, you simply need space to publish text or media, this shouldn’t be a problem.

Hidden ‘Costs’ with Free WordPress Hosting

Web hosts need to make money, after all they’re running a business. With free hosting you may have to compromise on your site’s appearance and whether or not it will have ads. It’s a bit like having your own TV show, with your website hosting provider as your producer. They have a say in how your website looks, since you’re not paying them.

WordPress is a great example of a renowned company that provides free hosting and then requires you to have a “powered/hosted by” label at the bottom of the page. WordPress is especially good, however, at keeping its branding subtle, even with their free website hosting option. Other providers put banners or pop-up ads on free sites. These are much less attractive to users, since they often find such advertising bothersome. With a business website, this can be especially damaging.

Another free web hosting model has recently become popular. Instead of focusing on advertising, you enter into an agreement to post high quality content. This encourages traffic to your site and works on a system of points: the points you gain go towards your hosting.

Is Free WordPress Hosting Worth It?

What Type of Website can have Free Hosting?

Free WordPress hosting is usually aimed at websites that don’t get much traffic. These are mostly personal sites that don’t need to support too much content or too many users – for example, personal blogs. It can also be used by new website owners to test run their website.

Free-hosted websites are usually on a shared hosting plan. This means that lots of similar websites are all powered by the same server, cutting costs and improving the environment. If one site is taking up too many resources however, it negatively affects the other sites. Some free web hosts do not allow web apps like PHP programs and others restrict the use of JavaScript, since it uses too much power from the server.

Choosing a Free Web Hosting Provider

Examine your options before deciding on a free hosting provider. WordPress is definitely on the list of trusted brands who provide free hosting and don’t try to catch you out. However, make sure you read the small print of any terms and conditions to ensure the WordPress free hosting option is right for your site.

There are lots of things to consider in the mix: the control panel, how the website will function, included features, and the level of customer service. You should be able to build your own website, and if that’s what you want, see if you like the templates on offer from a hosting company. Then, check to see if you have to pay for the templates. That might be where they’re making up for the cost of your free hosting.

Bottom Line

Yes, free hosting exists and it’s growing more popular every day, with competing companies offering you better options. Companies like WordPress try to make the browsing and building elements easy and enjoyable as a strategy to gain loyal customers who stay with them as their sites grow. Just bear in mind that your site will include the name of your host in the domain name and will probably appear somewhere on the site itself. As long as you’re OK with this, using WordPress as a free host can be the perfect option.

Friday 23 September 2016

It’s been quite a ride since cPanel introduced free hostname SSL certificates in version 56. In cPanel & WHM version 60, we are adding the ability to purchase wildcard certificates through the cPanel interface. Since wildcard certificates are the newest SSL certificate product that we have introduced, let’s go over the certificate options that cPanel & WHM currently offers.

Hosting cPanel and WHM, SSL Certifications

Gain trust with your free hostname certificate


Beginning with cPanel & WHM version 56, cPanel offers a free SSL certificate for every licensed cPanel & WHM hostname. This domain validated (DV) certificate provides security for your cPanel accounts’ login, and gives cPanel account users the confidence that their session information is protected.

Earn money through DV certificate sales


WHM’s Market, also released v56, gives WHM system administrators, like you, the ability to sell DV SSL certificates directly to their cPanel users. Your cPanel users can purchase cPanel- or Comodo-branded certificates through the SSL/TLS Wizard interface. When your users purchase these certificates, you earn a commission that you can redeem through the cPanel Store. You can activate cPanel’s SSL/TLS Wizard interface through WHM’s Market Provider Manager interface.

Free 90-day certificates through AutoSSL


We introduced AutoSSL in cPanel & WHM version 58. AutoSSL provides system administrators the ability to issue free, renewable 90-day SSL certificates to their cPanel account holders. Currently, we offer two different certificate providers in AutoSSL. WHM already includes cPanel (backed by Comodo) 90-day certificates, plus you can install a Let’s Encrypt plugin for AutoSSL. No matter how you use these, your cPanel users can benefit when you provide free SSL certificates through AutoSSL.

If you’d like to write your own plugin module for AutoSSL, you will be able to do so in cPanel & WHM version 60.

Get wild with wildcard certificates


For version 60, cPanel & WHM will provide the ability to sell wildcard certificates to your cPanel users through a simplified SSL/TLS Wizard interface in cPanel. You can use the cPanel Market in WHM’s Market Provider Manager interface to manage the cPanel Market products that you sell through the wizard.


Coming soon


We continue to expand your SSL certificate choices beyond DV and wildcard in future versions of cPanel & WHM. We plan to have organization validation (OV) and extended validation (EV) certificates available for sale in the future.

Wednesday 21 September 2016

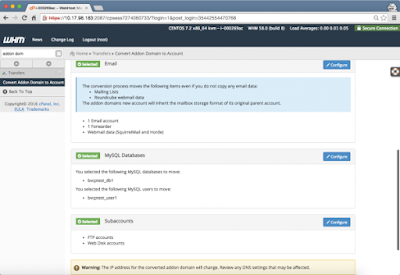
In cPanel & WHM version 56 we introduced a new tool to answer one of the most highly voted feature requests: “As a webhosting provider, I want to be able to convert an addon domain into its own account. In version 58 we expanded the feature, and today I want to introduce you to it: the Convert Addon to Account tool. This tool allows both the root user and resellers with the Super Privilege “Rearrange Accounts” to extract an existing Addon Domain from a cPanel account into its own cPanel account with just a few clicks. Let’s take a look!

The WHM Interface


Once you’re logged in to WHM, choose the “Convert Addon Domain to Account” tool from the sidebar. You will then be presented with a list of Addon domains and their associated cPanel username. Use the search box at the top of the list to reduce the number of displayed domains, or click the navigation buttons along the bottom to scroll through all the addon domains. Once you locate the domain you want to extract, click “Convert”.

cPanel & WHM’s Convert Addon to Account tool

You will then be taken to a second interface where you are allowed to choose the new username, define the new account’s package, and a slew of other options.

cPanel & WHM’s Convert Addon to Account tool

Logs for each conversion are stored on the server and are viewable in the same WHM interface. Here’s one example (including an example warning that is normal in our testing environment):

cPanel & WHM’s Convert Addon to Account tool

The Command Line Option


Using cPanel & WHM’s command line utilities you can easily initiate an addon-to-account conversion on the command line as well. In this case you will use the convert_addon_initiate_conversion WHMAPI1 call. For example, to extract the bvcptestaddon2.com domain to a new cPanel account bvcp2addon, you would use this command:

whmapi1 convert_addon_initiate_conversion domain=bvcptestaddon2.com user=bvcp2addon

Monday 19 September 2016

cPanel & WHM’s tiered update system has long allowed us to release new versions and features in stages. Each tier provides us access to a different type of feedback from a specific segment of our user-base.

The EDGE tier is a non-production tier that allows us to incorporate feedback from our users in an earlier and more actionable stage of our development cycle, and gives third party developers a chance to test their applications against new versions of the software. The CURRENT, RELEASE, and STABLE tiers are production-ready tiers, and help us deliver a consistent experience to our users. Additionally, coupled with a deferred rollout they allow us to triage any bugs that aren’t caught in our pre-release testing. The LTS tier allows users to stay on a single major release until they choose to upgrade to the next major version, while still receiving bug fixes and security updates.

Starting in 2017: One LTS Release per Year


As of January 2017 we will only be adding a single new version of cPanel & WHM to the LTS tier. Under the new model the first release of a new calendar year will enter the LTS tier at the same time as it enters the STABLE tier. The rest of the release tiers will update regularly with the new versions of cPanel & WHM as we traverse through our regular development cycle. There will be some overlap of support for the existing version and the new version in the LTS tier, but the length of that overlap has not yet been defined.

To illustrate, the only new version of cPanel & WHM to enter the LTS tier in 2017 will be version 62 and it will do so in the first quarter of the year. If we reach our goal of 4 version releases in 2017, the next version to enter the LTS tier would be version 70 in the first quarter of 2018. Version 62 and 70 would coexist in the LTS tier until support for version 62 ends, at which point version 70 would be the only version in the LTS tier for the remainder of 2017.

If you draw it out, next year would look something like this[1]:

cPanel’s tiered update system; New plans for the LTS tier


Why the change?


First and foremost: we’re matching our release cycle to our customer’s use patterns. In discussions with our clients we have identified that the overwhelming majority of the companies making use of the LTS tier follow the same pattern: they stay on one release version of our software until it is nearing End of Life, and then upgrade to the newest stable version. Since our releases have a one year life-span, it means those servers are upgrading to a new release version on average once a year.

Second, we reduce our development overhead. If we use the second quarter of 2016 as an example, cPanel’s developers were required to track and maintain (meaning providing security and bug fixes) for four versions of cPanel & WHM (11.50, 11.52, 54, 56) while working to develop a fifth (version 58). During that time only around 4% of our licenses were running a supported version of cPanel & WHM on an LTS tier, and 95% were on one of the release tiers (CURRENT, RELEASE, STABLE).

By reducing our supported LTS versions to only one a year, we only need to track and maintain two versions of cPanel & WHM while developing a third. That will free up signifiant time for our developers, our infrastructure, and our support team.


What this means for our users


For our typical users, this change will mean very little. People using the LTS tier will continue to do exactly as they have, and anyone using other tiers will continue to enjoy the continuous development to which they have become accustomed.

The one thing that might feel a little different for our long-time users is our security releases. We will still only release security updates for supported versions of cPanel & WHM, which means that only versions in the LTS, CURRENT, RELEASE, or STABLE tiers receive security updates. As soon as a version is replaced in the release tiers by its predecessor, it will reach End of Life.

Friday 16 September 2016

In this article I will give you a step-by-step guide on how to create a Peer Demo account in WebsitePanel

Overview


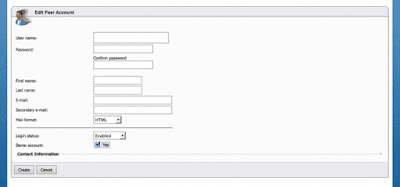
What is a Peer Account? Well, a oeer account is an alias for its parent user account. It has the same rights as its parent account. This type of account usually has the same DNP security roles, sees the same hosting spaces and user accounts. Peer accounts are very useful because it allows you to share your hosting account with a friend or colleague.

Getting Started


1. Log into your WebsitePanel hosting account with the Administrator account:

Create a Peer Demo account in WebsitePanel

2. Go to menu “Account -> Peers“:

Create a Peer Demo account in WebsitePanel

3. Click on “Create Peer Account“:

Create a Peer Demo account in WebsitePanel

4. Fill all the required fields, and please remember to set the demo account check-box to “Yes“:

Create a Peer Demo account in WebsitePanel

5. And that’s it! You just created a new demo peer account!

This Concludes Create a Peer Demo account in WebsitePanel

Thursday 15 September 2016

In a hosted multi-site environment you may find yourself needing to add multiple IP addresses to a server. Luckily, cPanel makes it very easy to add IP addresses. This article will go over adding IP addresses to standalone servers, both through WHM and from command line on a cPanel server.

You probably already know why you need more IPs on your server if you’re reading this, but humor me for a second. Here are a few reasons why you might need to add some more IPs:

Adding IP Addresses to a Server

*You are hosting multiple accounts/sites, some of which utilize SSL certificates. Apache requires each SSL certificate to have its own IP, and cPanel (currently) limits each account to one IP address…

*…So, you need to be able to assign sites to different IP addresses. Or  you host one of the idiots out there that thinks having each site on a separate IP is actually going to up their search engine rankings.

*You need more IP addresses to send email from, because your mail server’s IP is blacklisted

*You need to resolve routing or bandwidth problems between your server and other networks

cPanel utilizes the ipaliases service to process additional IP’s as virtual interfaces. Those of you already familiar with Linux IP aliasing using the ifcfg command probably already know that you can add an IP alias to, say, eth0, with the following command:

ifconfig eth0:0 123.456.789.123  netmask 255.255.255.0 up 

While this would technically work, it’s not how cPanel wants you to do it. When it comes to safely adding IPs to a standalone server, you have two options:

*Add the IP in WHM

*Add the IP directly to the ipaliases configuration

Understanding the Process 


When you add an IP to a cPanel server using a supported method, cPanel performs the following process:

1) Adds the IP as a alias to the main interface (usually eth0)

2) Rebuilds the IP Address pool (/scripts/rebuildippool ~> /etc/ipaddrpool)

The WHM Method 


To add an IP address via WHM, you can simply log in as a root user and go to “Add a New IP Address”, enter the IP and its subnet mask, and hit “Submit.”

The Command Line Method 


You can also add IPs via command line in a way that cPanel understands, which is mainly useful when doing automated server setups, or adding multiple IPs across multiple servers. To do this, you’d edit the ipaliases load file, which is /etc/ips . If you already have additional IP addresses on your server added as aliases you may already see how this file is formatted, but here’s an example:

123.456.789.123:255.255.255.0:123.456.789.255 

This is a colon-delimited file with each IP address on its own line. The first field is the IP itself, the second is its subnet mask, and the third is its broadcast. You can add as many IPs as you need, putting each on its own line.  When you’re done, run the following commands:

service ipaliases reload (or service ipaliases restart)
/scripts/rebuildippool 

To check whether the IPs have been added successfully, you can perform any of the following tests:

/scripts/ipusage  <~ will show the IP usage of the server
ifconfig <~ will show all IPs on the server
ping $ip <~ will ping the IP ($ip) you added to make sure it’s routing 

Note that for many VPS/Virtualized platforms (like Virtuozzo, OpenVZ, etc), you have to add the IP through the parent node in order for it to work. For OpenVZ/Virtuozzo, you would do:

vzctl set $VEID –ipadd 123.456.678.123 –save  (pass –ipdel to remove an IP) 

Then enter into the VPS and run /scripts/rebuildippool . In some cases you may also need to refresh the cPanel license:

/usr/local/cpanel/cpkeyclt 

Removing an IP Address 


Removing IP is exactly the opposite, where you can remove the IP from WHM ~> “Show or Delete Current IP Addresses” or by removing the IP lines from /etc/ips and reloading ipaliases.

Once you’ve added and assigned an IP to the server, cPanel will not let you remove it unless you change the IP address of the account using it to something else. If you want to override this, you can manually add the IP to /etc/ipaddrpool  and safely remove the IP via WHM. However, this in some cases has been known to unroute the other IPs on the server, so you’ll likely need to reload ipaliases again.

Tuesday 13 September 2016

The Paper Lantern theme has come a long way since I last wrote about customizing the cPanel interface. As of this date, the instructions are still valid with a few minor adjustments. The theme continues to evolve and with each improvement, the code must also be updated for any custom styles that you may have already created.

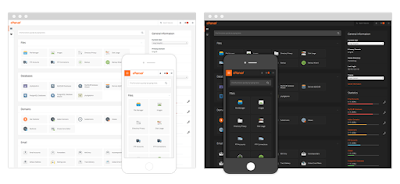
With that said, I have created a new template, called cP Starter that allows you to modify the appearance of the cPanel interface and kickstart your own custom style. cP Starter is a base style intended for designers, developers, server admins, resellers, and/or anyone who isn’t afraid to code. Currently, there are two interfaces available at your disposal: Light and Dark. These are both professional, yet minimalistic approaches that can be used as is or adapted to match your company’s branding and logo.

Free cP Starter Style

Beta Blues


cP Starter is a work in progress which we will continue to update and refine over time, so don’t be surprised if you encounter any bugs we may have missed. You can expect both cP Starter Light and Dark to be packaged and shipped with cPanel & WHM in future releases, along with the possibility of few additional style options. By then, we should have all of the latest changes completed, including bug fixes and enhancements. So if you’re feeling a bit adventurous and would like to get a head start, let’s get right to it.

Custom Style Installation


First, you’ll want to identify the type of role that best suits your needs in order to complete the installation. Secondly, cP Starter is only compatible to cPanel & WHM 56 or later. For demonstration purpose, the folder “cP_Starter_Light” will be used to guide the setup process.

1. Download and extract the files from Github:


2. Place the extracted files in a new folder called cP_Starter_Light and upload them in the following directory: (Note: if the directory folders do not exist, create them in the right order):

Server:

/var/cpanel/customizations/styled/cP_Starter_Light/

Reseller:

/home/reseller/var/cpanel/reseller/styled/cP_Starter_Light/
(Note: reseller – represents the cPanel account’s reseller’s username)

cPanel User:

/home/username/var/cpanel/styled/cP_Starter_Light/
(Note: username – represents the cPanel account’s username)

3. Generate custom icons via command line (Note: this is optional as it replaces existing icons):

Both Server & Reseller:

1. Log in to the server via SSH as a root or reseller user
2. Run the command line:

/usr/local/cpanel/bin/sprite_generator --theme paper_lantern --style cP_Starter_Light

4. Change your default style interface:

Server:

1. Log in to the server via SSH as the root user
2. Run the command:

ln -s /var/cpanel/customizations/styled/cP_Starter_Light /var/cpanel/customizations/styled/default_style

(Note: This sets the default for all new accounts. It does not modify any existing accounts. To do so, you will need to change default style under “cPanel User” instruction.)

Reseller:

1. Login to cPanel
2. Navigate to Change Style: Home > Preferences > Change Style
3. Select “Set as Default” to apply every cPanel account or select “Apply” for a specific account.

cPanel User:

1. Login to cPanel
2. Navigate to cPanel Style: Home > Preferences > Change Style
3. Click “Apply”

5. Change cPanel default logo to your own brand logo:

Both Server and Reseller:

1. Login to WHM
2. Navigate to Branding: cPanel > Branding
3. Upload your logo under Company Logo 

With 5 steps, you should successfully see the new cPanel dashboard interface. You can have multiple instances of styles without affecting the originals. To do this, simply duplicate the folder within the same directory, rename it to your own, and follow the same steps above. I hope this helps you save time branding your cPanel interfaces.

Monday 12 September 2016

Three and a half years ago (in a galaxy far, far away) cPanel began planning a feature that we hoped would make the entire internet safer and more secure. There have been a lot of changes, both in the industry and in the company, since then. It took significant re-writes of a lot of the systems inside cPanel & WHM and the cPanel store, but it’s finally here. In cPanel & WHM version 58 we welcome AutoSSL, and it is a fantastic addition to our list of features.


What is AutoSSL?


AutoSSL is the solution one of the biggest pain points that exists for every cPanel & WHM user: SSL installation and renewal. With AutoSSL there are no more forms to fill out, and no more certificates to manually copy into place. Once you enable AutoSSL your websites are automatically secured with a Domain Validated SSL certificate. Perhaps more exciting is the fact that your coverage will never lapse, because at expiration time a new SSL is requested and automatically installed.


How do you enable AutoSSL?


Enabling is easy! In WHM navigate to the AutoSSL interface, and adjust the selected toggle to cPanel. Then click save.

cPanel & WHM’s AutoSSL

The server will automatically do the following:

Add a feature to WHM >> Packages >> Feature Manager named “AutoSSL”
Add a cronjob ( /etc/cron.d/cpanel_autossl ) to handle the downloading and installation of new SSL certificates for all of your hosted domains.

Troubleshooting AutoSSL


If you have any problem with the application, you can view the logs for AutoSSL right from the WHM interface. After the first run of the cronjob you’ll see the logs listed in the ‘Logs’ tab. You can load the log by selecting the log file you’d like to view and clicking ‘View Log’.

cPanel & WHM’s AutoSSL

What’s next for AutoSSL?


It looks like cPanel & WHM version 58 will make it to RELEASE next week, which means this feature will start popping up for more and more of our customers. One of the most highly requested additions to AutoSSL is support for Let’s Encrypt.

We’re also working on adding SNI support to cPanel, WHM, and Webmail. When that’s complete, the free SSLs will allow all cPanel, WHM, and webmail logins to use the domain SSLs, and resolve this feature request. That might not make it until cPanel & WHM version 62, but it’s definitely coming!

Upgrade now to take advantage of AutoSSL


AutoSSL was introduced as a new feature in v58, but if you’re still running CentOS 5 or CentOS 6 32-bit, you won’t be able to take advantage. cPanel & WHM v56 is the last to support CentOS 5. If you want the benefits of AutoSSL, it’s time to migrate! Our Server Configuration additions to the Transfer Tool make it easier than ever, so what’s holding you back? 

Saturday 10 September 2016

How to Set up a Local cPanel FastUpdate Mirror
If you have more than a few cPanel servers in your network, it may be a good idea to set up your own mirror to serve the files necessary to run cPanel updates. Doing this could save time and bandwidth, as well as prevent problems caused by mirrors being overloaded every time a new version of cPanel is released.

To start, you’ll need a physical or virtual server running a CentOS 7 minimal.  I would recommend at least 50GB of space and 1GB of RAM, though more RAM wouldn’t be a bad idea if you have a lot of cPanel servers. If you do have a lot of servers, you may want to consider setting up several mirrors to help spread the load around. You can then either set up specific servers to use a certain mirror, or use round-robin DNS to link a hostname to the IP of each mirror you set up.

First, make sure to remove existing web servers:

yum remove httpd varnish

Install firewalld:

yum install firewalld
service firewalld start
systemctl enable varnish

Run the following script:

curl -L https://updateseeds.cpanel.net/install.sh | sh

Now, make sure the cPanel-provided Varnish server is running:

service httpupdate-varnish restart
systemctl httpupdate-varnish enable
/usr/sbin/httpupdate_varnish_update_vcl

Since this setup uses firewalld, by default the setup script will open ports 80 and 22. If you don’t want either of these enabled, you can remove them from the config like so:

firewall-cmd –zone=public –remove-service=ssh

And to add specific IPs to the public zone:

firewall-cmd –zone=public –add-rich-rule=’rule family=”ipv4″ source address=”1.2.3.4″ accept’

Alternatively, you can just remove firewalld and use iptables or whatever other firewall you want to use. Firewalld is only necessary during the installation process. Port 80 needs to be accessible by the hosts using the mirror.

Once the mirror is set up, you can confirm it is working by going to the hostname or IP of the server in a browser. You should see the cPanel downloads page loading. If you see other content, it means there’s another web server running on port 80 that needs to be disabled first.

To enable the mirror, simply add it to /etc/cpsources.conf:

HTTPUPDATE=your.mirror.com

When you run a cPanel update, it will pull sources from that mirror instead. cPanel recommend running an update from one server first in order to build the cache.

Thursday 8 September 2016

The Internet as we all know it today wouldn’t have existed without the HTTP protocol. It is the heart and soul that pumps content to all of us. It makes it possible for us to read the latest news, order stuff online, watch videos on YouTube and get to our favourite websites on all types of devices - workstations with 27-inch displays, laptops, mobile phones, tablets and even e-readers that offer browsing capabilities. Sadly, that protocol has not been changed since 1999 when version 1.1 was released so, when HTTP/2 was released earlier this year, it was a source of major excitement. Of course, the SiteGround team has immediately started working on it and we are now happy to announce that all our shared and cloud servers support HTTP/2.

HTTP/2 Now Available on all shared/cloud servers at SiteGround


Why HTTP needed an update?


Modern websites/apps make hundreds of HTTP requests and HTTP 1.1 is not well designed for the performance needs of the modern web and the constantly growing requirements of the users. During the last 16 years many new technologies emerged and web developers got really creative in terms of going around and jumping over the limitations of HTTP 1.1. However, it was time for the protocol itself to change and introduce some new features that will speed up all sites on the Internet.

What’s new in HTTP/2?


HTTP/2 is based on SPDY and is focused on performance improvements. It offers the following enhancements:

Multiplexing For Faster Data Transfer


Modern websites/apps require the web browsers to make many request to render a web page. In the beginning HTTP/1.0 allowed only one request to be made via a single TCP connection. With HTTP/1.1 this was addressed so browsers can make multiple requests to load many resources simultaneously. Unfortunately, another problem called head-of-line blocking was not resolved.

HTTP/2 Now Available on all shared/cloud servers at SiteGround
When HTTP/1.1 is used the requests flow is usually the following: the browser sends a request and needs to wait for the response of the server in order to send the next request. Modern websites have over 100 objects and even when browsers use multiple connections this way of handling requests can add up a lot of time because of head-of-line blocking.

The solution introduced in HTTP/2 is called multiplexing. It gives us a simple way to request and receive multiple web objects at a time through a single connection. It is the solution for the head-of-line blocking problem. HTTP/2 resolves this problem by using frames. Every frame contains meta information about requests/responses which allows one connection to be used for simultaneous delivery without causing confusion about which response is associated with which request. Here is an example how HTTP/2 handles the same three requests that we showed in the previous diagram:

HTTP/2 Now Available on all shared/cloud servers at SiteGround
As you can see from the second diagram when HTTP/2 is used the user sends multiple requests and can receive them in whatever order. Thus, pages load faster. For example, the server needed more time to handle the second request but the delivery of the third object was not blocked.

Compression Of Headers For Transferring Less Data


The second big improvement added by HTTP/2 is related to HTTP headers. Clients use headers to inform servers what information is needed and in what format the information could be delivered to them. For example, a web browser usually sends headers to inform the servers that it supports gzip compressed data. Cookies are also communicated via headers and the size of some cookies can get really big.

The problem is headers do not change much between requests. Also, with HTTP/1.1 headers have to be provided for every single request, which of course is pointless when headers do not change. Now HTTP/2 not only sends headers per connection, but it also offers compression. This means that an average web page that contains ~80-90 objects can now be loaded much faster because the web browser will need just one round trip to send all of the headers for all of the objects.

Prioritization For Proper Page Rendering


The third problem which HTTP/2 solves is caused by multiplexing and headers compression. Some objects are more important than others. For example, the CSS objects for a site should be delivered in the beginning, so that the site could be properly displayed. If multiplexing is used you cannot be sure that the CSS will be delivered before the rest of the objects.

The designers of the protocol, decided to address this issue in the protocol itself. Clients are able to communicate with the server and indicate priorities for certain objects and this way the web servers can make decisions about which objects should be delivered first to the clients. Since the protocol itself supports prioritization this means that web developers should not worry about changes that need to be made to their apps. The modern web browsers will take care of prioritization and handling of data streams in HTTP/2.

HTTP/2 Needs SSL/TLS


All web server implementations support HTTP/2 when it is used over an encrypted connection. This means you need an SSL for your website in order to take advantage of HTTP/2.

Is HTTP/2 already in use?


HTTP/2 is already alive and you have probably already using it on your end if you’re using a modern browser such as all of the latest versions of Chrome, Firefox, Opera and Edge support HTTP/2.

Now all SiteGround shared/cloud servers support HTTP/2. Please note that clients that have private SSL certificates (see above: encryption is a must when HTTP/2 is used) can immediately take advantage of the new cool performance optimizations offered by HTTP/2.

Wednesday 7 September 2016

You’ve probably come across various subdomains throughout your time spent searching online. But, maybe you’ve always wondered why companies use them, and if you can see any benefits from using them in your own website?

A subdomain is a third-level domain that’s part of the original top-level domain. Think of something like “register.hostgator.com”, compared to the original top-level, which is “hostgator.com”.

Below we dive into what subdomains are, why they would be used, and how they can affect your current SEO strategy.

Why Would You Use a Subdomain?


To make it simple, a subdomain is a part of the main website. But, it’s considered a separate entity by the search engines. Subdomains can be used for organizational purposes, or even for an SEO boost.

What Are Subdomains, and How Do They Affect SEO?

Sometimes you don’t want certain pages of your site indexed with the rest of them. We can’t predict your unique circumstance, but some of the most common explanations are below.

1. Hosting a Blog


Some companies like to keep their blog separate for certain reasons. This can either be because the blog has a different design than the rest of the site, or they want to create a distinction between that content and the rest of their site.

If you’re building out a blog that’s a large content powerhouse, then you might want the flexibility that a subdomain will give you.

Some companies even decide to use a subdomain for other practical purposes, such as a dedicated help desk or forum. HostGator’s support page follows this approach. Often, this type of website needs to utilize a different kind of platform or software, so it makes sense to utilize a subdomain.

2. To Cater to Different Regions


Sometimes your website caters to different regions of the US, or even spans out into global sectors. Instead of having a single website with a very confusing website architecture, you can create sub-domains for each specific region.

The first example that comes to mind is Craigslist. Each region has it’s own dedicated sub-domain. Without having their site broken down this way it would be nearly impossible to use.

3. Showcase Different Product Lines


Your line of products and services may be so diverse that you might want to separate them out into different niches. This can help you to focus your efforts and provide your visitors with a more relevant browsing experience.

Subdomains and SEO


Your subdomains will be treated as entirely separate websites in the eyes of Google, as Matt Cutts explains:


This means you can create unique authority for each of the subdomains you’re using. Subdomains can actually be beneficial to your SEO efforts, as you’ll see below.

1. Subdomains Can Insert Keywords Into URL


Sometimes it just doesn’t make sense to fit certain keywords into your main URL. But, with subdomains you have another chance to insert hard-to-rank keywords into your domain. Which will never be a bad thing for your rankings.

2. Subdomains Can Improve User Experience


If you have a large and confusing site that’s hard to navigate, you’re going to provide a poor user experience. A poor user experience means your users will spend less time on your site, which can lead to lower rankings.

3. Subdomains Can Grow Niche Authority


Building large-scale authority can be a lot of work. However, ranking in niche markets can take a lot less time and energy. By ranking and building authority and smaller markets this authority you build will help to reinforce the authority of the main domain.

We hope that you now have a better understanding of subdomains and the role they can play throughout your site’s organization and your existing SEO strategy.

Tuesday 6 September 2016

What is Cybersquatting?


Cybersquatting is when a person buys a domain name that matches a name they know is trademarked or otherwise owned by someone else. In the early days of the Internet, before the majority of brands already had an established website, it was very common.

Cybersquatting: 7 Tell-tale Signs You’re Dealing With A Domain Name Shark

Now, it doesn’t happen as frequently because most brands already own the best domain name for their brand. Now and then, you’ll still see famous cases in the news, particularly those related to celebrities and politicians.

Friday 2 September 2016

The internet is playing an increasingly prominent role in commerce, and research shows that digital interactions influenced retail sales to the tune of in 2015. This number will only go up, but what does this mean for your business?

5 Little Tweaks to Boost Sales from Your Website

According to data from Eisenberg Holdings, for every $92 the average company spends to get customers to their site, they spend just $1 to convert them. So much attention is paid to driving traffic, to getting attention, that what really matters – getting people to convert – is ignored.

If you have a website, boosting sales is no rocket science. In fact, simple little tweaks – that can sometimes take minutes to implement – can double your revenue. Here are 5 little tweaks you can implement today that are proven to give you a sales boost:

1. Give Your Website a Speed Boost: The speed of your website can make or break your business. Research shows that a one second delay in site speed results in a 7% loss in conversion. For perspective, a one second delay in site speed could cost Amazon $1.6 billion in sales annually.

Radware was able to double conversions for one of their clients by improving page load time by 2 seconds. This makes sense considering that 51% of people abandon a purchase because of slow websites, and many won’t bother to return.

There are several ways to go about giving your website a speed boost, but having a good web host is the most important; for that, with a rating of 10/10 when they underwent our rigorous checks, InMotion Hosting is definitely unrivaled!

2. Use Trust Seals to Increase Your Website Trust Factor: Many people are not buying from you because they don’t trust you, and a simple tweak can change that. Research conducted by Econsultancy/Toluna shows that a whopping 48% of people look for trust seals on a website to determine if it can be trusted before they pay online.
With the increasing threat of viruses, hackers, and online scammers, it’s understandable that many people won’t just pull out their credit cards. Fix this by using trust seals on your website, and watch your sales soar. The Norton trust seal is the most-regarded, followed by the McAfee and TRUSTe trust seals.

3. Use Elements of Social Proof: Nobody wants to be a lone wolf. If people perceive that others are not interested in your brand, they are less likely to be interested as well.
Research reveals that 88% of consumers trust reviews as much as personal recommendations and nearly 9 in 10 consumers read reviews to determine the quality of a business.

Reviews, testimonials, case studies and other elements of social proof will go a long way to boost your brand’s perception in the mind of people, leading to increased sales for you.

4. Introduce Elements of Scarcity: One of the most powerful techniques for boosting sales on a website is to introduce elements of scarcity. A study by WhichTestWon revealed that a countdown timer on a product page led to a 9% increase in conversion, and the right introduction of scarcity to sales campaigns have always led to increased sales.
Whether it is in form of limited offers, countdown timers, or special bonuses for people who act fast, introducing elements of scarcity can give your business a much needed sales boost.

5. Make it Clear and Focused: Data from Nielsen Norman Group shows that the average web user leaves a web page within 10 – 20 seconds, but pages with a clear value proposition can get people to stay longer.
If people can’t stay on your website, they won’t buy. Work on having a clear and focused website, and ensure that your offer is properly presented. This will result in a sales boost for you.

Facebook

Popular Posts

Blog Archive

Total Pageviews