The Paper Lantern theme has come a long way since I last wrote about customizing the cPanel interface. As of this date, the instructions are still valid with a few minor adjustments. The theme continues to evolve and with each improvement, the code must also be updated for any custom styles that you may have already created.
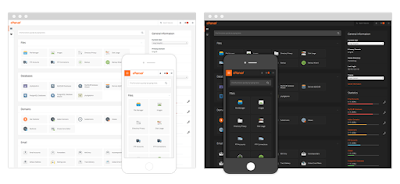
With that said, I have created a new template, called cP Starter that allows you to modify the appearance of the cPanel interface and kickstart your own custom style. cP Starter is a base style intended for designers, developers, server admins, resellers, and/or anyone who isn’t afraid to code. Currently, there are two interfaces available at your disposal: Light and Dark. These are both professional, yet minimalistic approaches that can be used as is or adapted to match your company’s branding and logo.
 Server:
 Reseller:
 cPanel User:
 Both Server & Reseller:
 Server:
 Reseller:
 cPanel User:
 Both Server and Reseller:
With that said, I have created a new template, called cP Starter that allows you to modify the appearance of the cPanel interface and kickstart your own custom style. cP Starter is a base style intended for designers, developers, server admins, resellers, and/or anyone who isn’t afraid to code. Currently, there are two interfaces available at your disposal: Light and Dark. These are both professional, yet minimalistic approaches that can be used as is or adapted to match your company’s branding and logo.
Beta Blues
cP Starter is a work in progress which we will continue to update and refine over time, so don’t be surprised if you encounter any bugs we may have missed. You can expect both cP Starter Light and Dark to be packaged and shipped with cPanel & WHM in future releases, along with the possibility of few additional style options. By then, we should have all of the latest changes completed, including bug fixes and enhancements. So if you’re feeling a bit adventurous and would like to get a head start, let’s get right to it.
Custom Style Installation
First, you’ll want to identify the type of role that best suits your needs in order to complete the installation. Secondly, cP Starter is only compatible to cPanel & WHM 56 or later. For demonstration purpose, the folder “cP_Starter_Light” will be used to guide the setup process.
1. Download and extract the files from Github:
2. Place the extracted files in a new folder called cP_Starter_Light and upload them in the following directory: (Note: if the directory folders do not exist, create them in the right order):
/var/cpanel/customizations/styled/cP_Starter_Light/
/home/reseller/var/cpanel/reseller/styled/cP_Starter_Light/
(Note: reseller – represents the cPanel account’s reseller’s username)
/home/username/var/cpanel/styled/cP_Starter_Light/
(Note: username – represents the cPanel account’s username)
3. Generate custom icons via command line (Note: this is optional as it replaces existing icons):
1. Log in to the server via SSH as a root or reseller user
2. Run the command line:
/usr/local/cpanel/bin/sprite_generator --theme paper_lantern --style cP_Starter_Light
4. Change your default style interface:
1. Log in to the server via SSH as the root user
2. Run the command:
ln -s /var/cpanel/customizations/styled/cP_Starter_Light /var/cpanel/customizations/styled/default_style
(Note: This sets the default for all new accounts. It does not modify any existing accounts. To do so, you will need to change default style under “cPanel User” instruction.)
1. Login to cPanel
2. Navigate to Change Style: Home > Preferences > Change Style
3. Select “Set as Default” to apply every cPanel account or select “Apply” for a specific account.
1. Login to cPanel
2. Navigate to cPanel Style: Home > Preferences > Change Style
3. Click “Apply”
5. Change cPanel default logo to your own brand logo:
1. Login to WHM
2. Navigate to Branding: cPanel > Branding
3. Upload your logo under Company Logo
With 5 steps, you should successfully see the new cPanel dashboard interface. You can have multiple instances of styles without affecting the originals. To do this, simply duplicate the folder within the same directory, rename it to your own, and follow the same steps above. I hope this helps you save time branding your cPanel interfaces.


0 comments:
Post a Comment